Report Memphis.dev Cloud Performance And Load Report
Development
Building Distributed Systems with NATS Jetstream and Golang

 Contents
The future of distributed applications is indeed bright, offering unparalleled scalability, fault tolerance, performance, and availability. But great power always comes with a catch. There’s a substantial increase in complexity that challenges traditional methods and demands innovative new solutions. To address this escalating complexity, new technologies such as NATS, Kubernetes, and others have emerged.
NATS is a cloud-native, open-source, high-performance messaging system. It is often used in microservices in cloud native environments where the scale and performance are critical factors. NATS simplifies how your services communicate in distributed systems. While the NATS core is the standard messaging API there is one more layer on top of the NATS core, called NATS JetStream. JetStream extends the NATS streaming server with a performant, secure, and persistent storage mechanism, turning it into a full-fledged event streaming platform. The NATS is written in Go language. Thus NATS offers an official NATS Go client, which creates an easy-to-use API for interacting with a NATS server and utilizing JetStream features.
This blog will guide you through the process of building a simple weather application utilizing NATS JetStream as the message-oriented middleware (message broker), with a focus on implementing the application using the Go programming language. Also, there are other message buses/brokers such as Kafka, Memphis(a streaming stack built with NATS as its core), and RabbitMQ.
Setting up NATS Server and Jetstream
NATS JetStream is the NATS persistence engine providing streaming, message, and worker queues with At-Least-Once semantics. JetStream stores messages in streams. It is designed to build distributed systems with key features such as persistence for durable messages storage with stream-based messaging and publish-subscribe capabilities.
To create your Golang NATS distributed application, you need first install a NATS Server. Its docs provide multiple ways to install a NATS server based on your environment. In this guide, we will use Docker to do so.
- Make sure Docker is installed on your environment.
- Navigate to your working directory and pull the latest NATS docker image.
pull nats:latest
- Run on Docker
docker run -p 4222:4222 -ti nats:latest
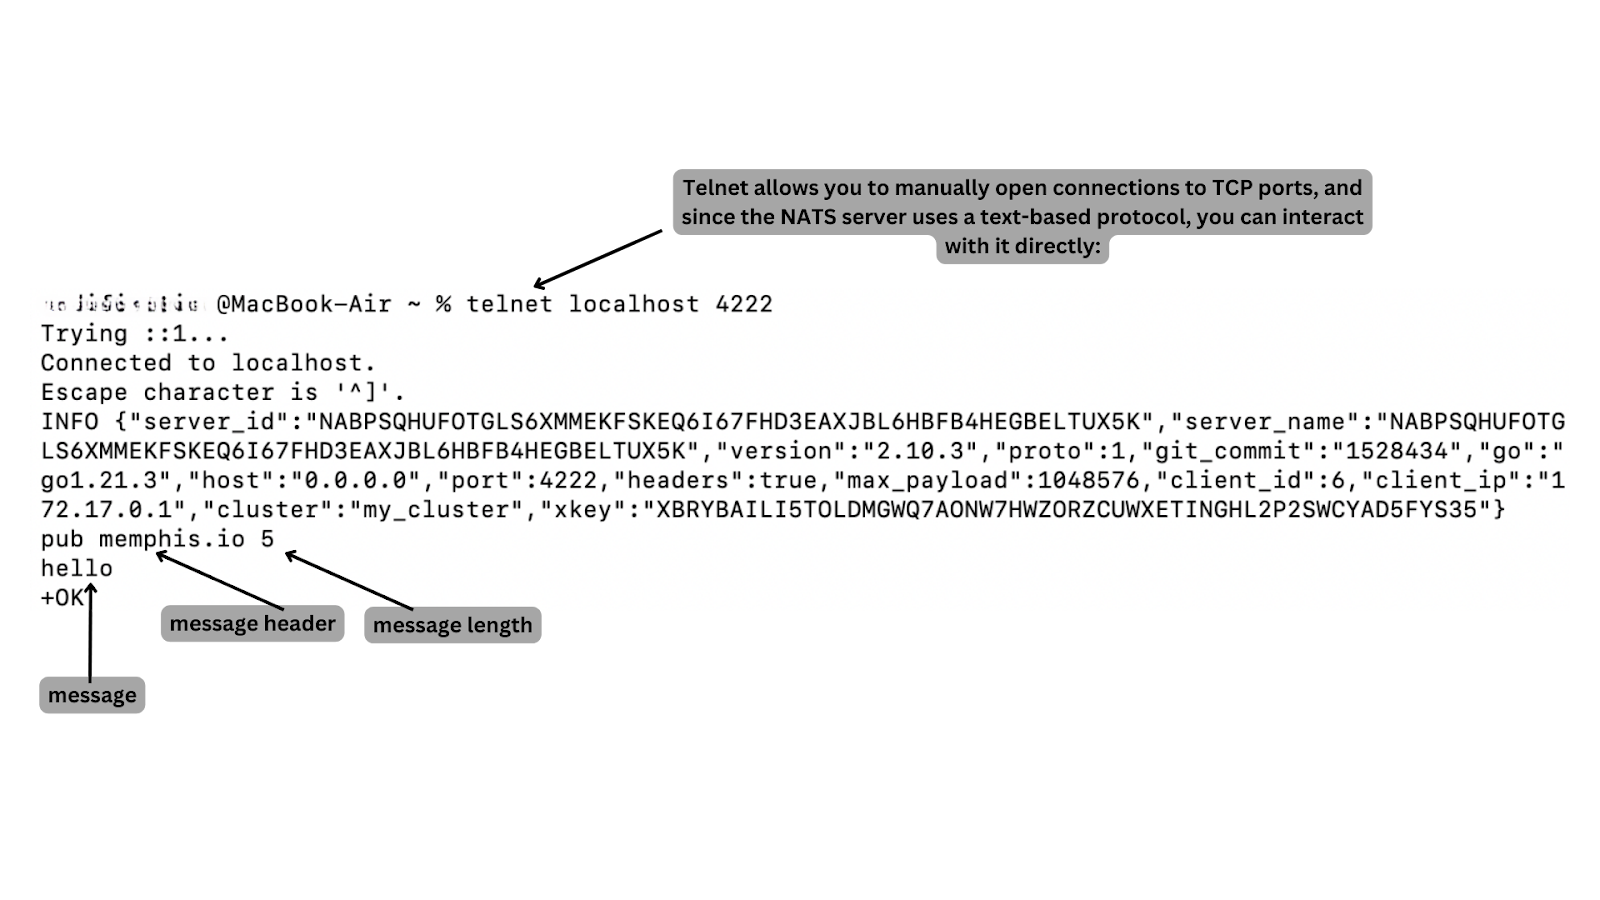
The Docker compose code will spin a nats-server container server on port 4222. By default, the NATS server will start listening for NATS client connections on port 4222. While running the server, the command will run the flag -js to enable Jetstream. It launches the NATS server and configures it to support NATS Jetstream. When the NATS server is running use the telnet or natscli tool to test the connection.
Alternatively, you can use your favorite package manager and still install NATS.
- For example, if on Mac OS, use Homebrew to install the NATS server:
brew install nats-server
- To run the server, use the following command to execute the NATS server:
nats-server -js
- This command should log messages indicating that Jetstream is enabled and the NATS server is running.

Running NATS Jetstream Go Client
Now your NATS server is running, and Jetstream is ready to manage streams. To use NATS as a publish-subscribe messaging system, you need a client. In this case, you are going to use Golang. NATS Go client provides all the functionalities you need for a Go client to communicate with the NATS messaging system. Speaking of communication, there are different patterns for communication between clients, such as request-reply, publish-subscribe, queueing, event sourcing etc.
-
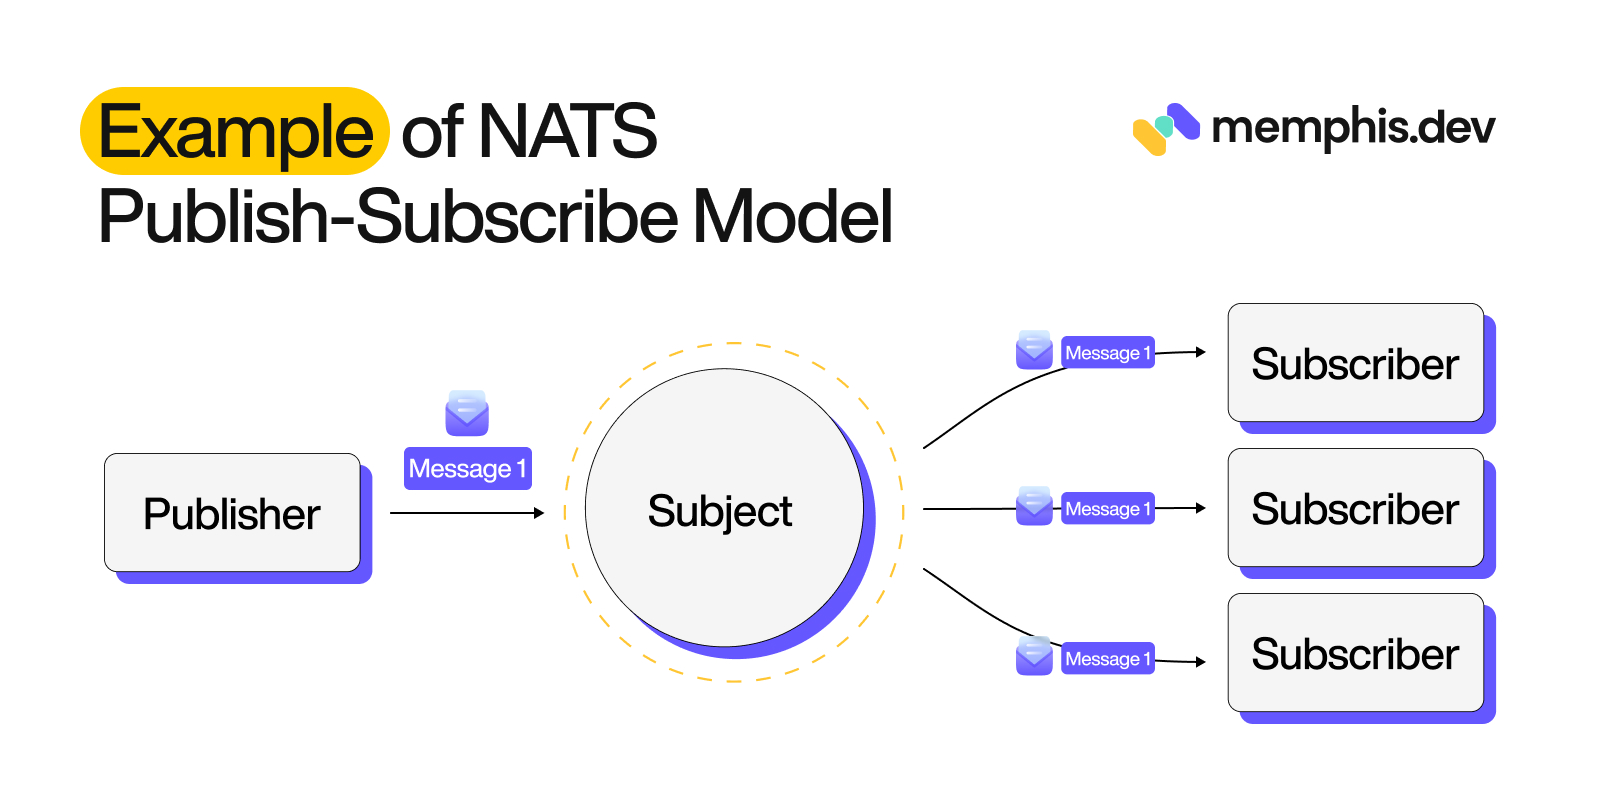
Publish-Subscribe Communication Pattern (Fan-out Variant)
A publish-subscribe variant known as the fan-out pattern broadcasts messages to all available processing units (subscribers/consumers) in a system. When each processing unit needs to get a copy of the message to allow for parallel processing, this pattern is useful.
To implement at first, ensure you have Golang installed on your command and initialize your working directory using the following command:
go init mod go_nats
To install the NATS Go client, run the following command within your working directory:
go get github.com/nats-io/nats.go
Within your working directory create a main.go file. The code samples used in the coming steps will be saved in this file. Ensure you have the following imports ready, as you will use them later:
cat << EOF > main.go
package main

import (
“encoding/json”
“log”
“math/rand”
“time”
“runtime”

“github.com/nats-io/nats.go”
)
EOF
Connecting to NATS Server using Go
To publish messages to your servers, you need to establish a connection to the NATS server Default URL {nats://127.0.0.1:4222}.
In your main.go file, create the connect function as follows:
func connect() *nats.Conn {
nc, err := nats.Connect(nats.DefaultURL)
if err != nil {
log.Fatal(err)
}
return nc
}
nats.Connect will execute a connection to the server using constant DefaultURL. Up to now, you should have the NATS server running and accessible at the default URL.
Using the above-created connection, initialize Jetstream. This will allow you to have Jetstream operations such as creating streams, publishing messages, and subscribing to messages.
func initializeJetStream(nc *nats.Conn) nats.JetStreamContext {
js, err := nc.JetStream()
if err != nil {
log.Fatal(err)
}
return js
}
Creating Stream
A stream creates a message store that defines how messages are stored. Here you need to create the stream name for storing the application messages. NATS also uses Subjects that create a subject-based messaging.
A subject is just a string of characters that form a name the publisher and subscriber can use to find each other.
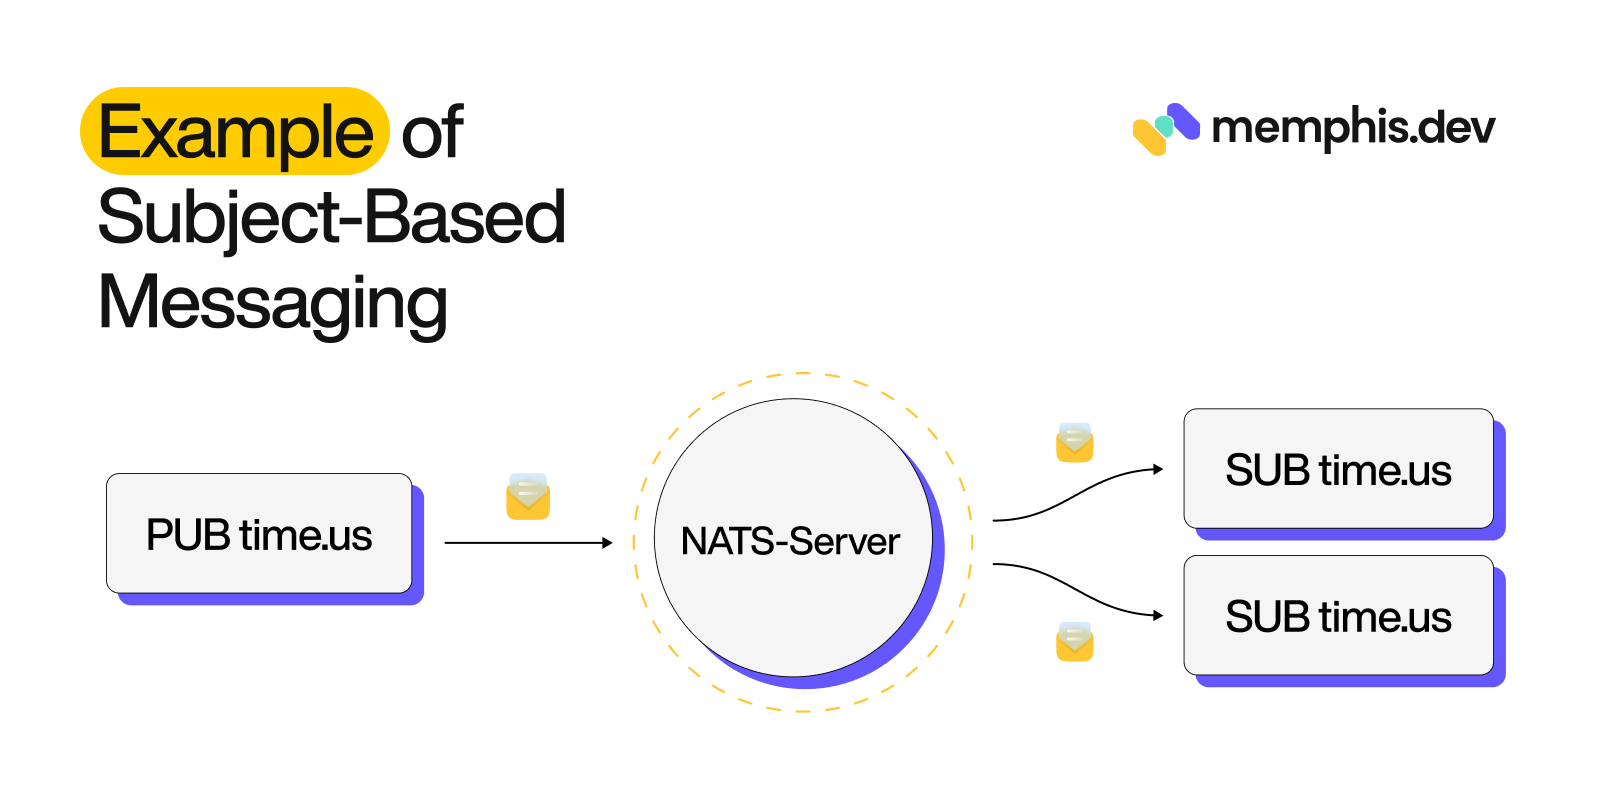
In this example will build a simple weather, publish-subscribe model. First, create the following constants describing your stream.
const (
    StreamName = “weather”
    Subjects   = “weather-data.*”
)
Use AddStream to create a Jetstream stream with the above-specified name and subjects:
func createStream(js nats.JetStreamContext) {
    streamConfig := &nats.StreamConfig{
        Name:     StreamName,
        Subjects: []string{Subjects},
    }
    _, err := js.AddStream(streamConfig)
    if err != nil {
        log.Fatal(err)
    }
}
Publishing Messages
A message contains the payload that will be saved in your stream. Since we don’t have ready weather data, we will simulate a data generation example. This will generate multiple messages the publisher will use to publish to the stream:
// data
type WeatherData struct {
Timestamp   time.Time `json:”timestamp”`
Temperature float64   `json:”temperature”`
Humidity    float64   `json:”humidity”`
}

func publishWeatherData(js nats.JetStreamContext) {
for {
data := WeatherData{
Timestamp:   time.Now(),
Temperature: 20.0 + rand.Float64()*10.0,
Humidity:    30.0 + rand.Float64()*40.0,
}
// encode data into JSON format for standardized message structure.
jsonData, err := json.Marshal(data)
if err != nil {
log.Println(err)
continue
}
_, err = js.Publish(“weather-data.sensor1”, jsonData)
if err != nil {
log.Printf(“Error publishing message: %s”, err)
continue
}

log.Printf(“Published message: %s”, jsonData)
time.Sleep(1 * time.Second)
}
}
NATS server should now be able to receive messages and publish them. Each message will have the timestamp of when the message was created, and computed temperature and humidity values.
Let’s check if this works as expected. Ensure you have a main function to execute all the above-created functions as follows:
func main() {

    nc := connect()
    defer nc.Close()
    js := initializeJetStream(nc)
    createStream(js)
    go publishMessage(js)
    select {}
}
Then within the working directory, execute go run main.go. The application should publish the messages to your stream:

Consuming Messages
To complete the publish-subscribe model, you need consumers who subscribe to the published messages.
NATS’s publish-subscribe model uses a one-to-many (fan-out) communication. The publisher will send messages on the subject created. Any active subscriber can listen on that subject and consume messages as such:
To allow subscribers to consume the messages, process the received weather messages as follows:
func handleIncomingMessage(msg *nats.Msg) {
var data WeatherData
err := json.Unmarshal(msg.Data, &data)
if err != nil {
log.Println(err)
return
}

log.Printf(“Received message: Timestamp: %s, Temperature: %f, Humidity: %f”,
data.Timestamp.Format(time.RFC3339), data.Temperature, data.Humidity)
}
Create a Jetstream subscription for the subjects and subscribe to the Jetstream stream:
func consumeMessages(js nats.JetStreamContext) {
sub, err := js.SubscribeSync(Subjects)
if err != nil {
log.Fatal(err)
}
defer sub.Unsubscribe()
for {
msg, err := sub.NextMsg(30 * time.Second)
if err != nil {
log.Fatal(err)
}
handleIncomingMessage(msg)
}
}
To execute the subscribers update the main functions as follows:
func main() {
runtime.GOMAXPROCS(runtime.NumCPU())
log.SetFlags(log.Ldate | log.Ltime | log.Lshortfile)
nc := connect()
defer nc.Close()
js := initializeJetStream(nc)
createStream(js)
go publishWeatherData(js)
consumeMessages(js)
}
Rerun your application (go run main.go), and you should now have the two subscribers consuming each published message:

-
Request-Reply Communication Pattern
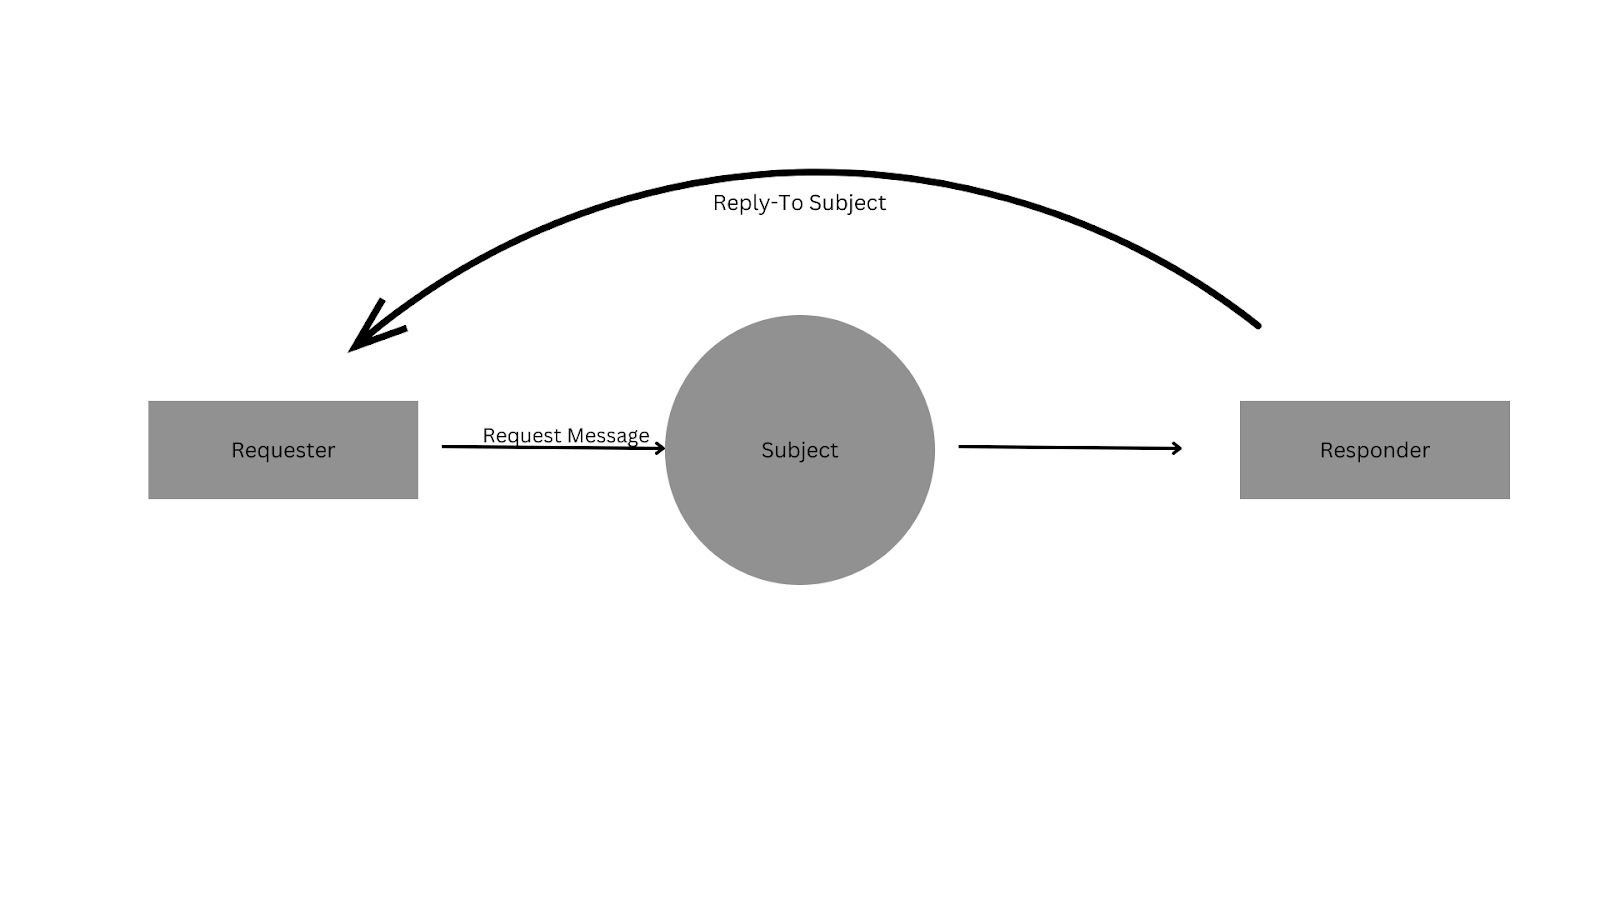
In a typical request-reply pattern, a client sends a request to a specific subject, and one or more subscribers listening to that subject process the request and respond with a reply. This pattern is synchronous, as the client waits for the response before proceeding.
The “requester” (client) and the “responder” (server) are normally two distinct parts when implementing the request-reply pattern. These elements could be found in a single program or separate programs. They frequently run as separate programs in production systems, possibly on different machines. However, you might have both in the same program for testing, education, or simple applications.
To implement this approach first follow the below steps that we already discussed under the publish-subscribe communication pattern (fan-out variant)
- Ensure you have Golang installed
- Initialize your working directory
- Install the NATS Go client
- Ensure all the imports are correctly made
Once you complete the above steps, next to publish messages to your servers, you need to establish a connection to the NATS server default URL (nats://127.0.0.1:4222).
Connecting to NATS Server using Go
In your main.go file, create the connect function as follows:
func connect() (*nats.Conn, nats.JetStreamContext) {
nc, err := nats.Connect(nats.DefaultURL)
if err != nil {
log.Fatal(err)
}
js, err := nc.JetStream()
if err != nil {
log.Fatal(err)
}
return nc, js
}
nats.Connect will execute a connection to the server using constant default URL. Up to now, you should have the NATS server running and accessible at the default URL.
Initiate the Responder
Function weatherResponder encapsulates the server’s listening behavior. It subscribes to a subject, waiting for incoming messages. Once it confirms subscription (hence, it is ready to listen), it signals its readiness.
func weatherResponder(js nats.JetStreamContext, ready chan<- bool) {
const subject = “weather.get”
_, err := js.Subscribe(subject, func(msg *nats.Msg) {
data := WeatherData{
Timestamp:   time.Now(),
Temperature: 20.0 + rand.Float64()*10.0,
Humidity:    30.0 + rand.Float64()*40.0,
}
// encode data into JSON format for standardized message structure.
jsonData, err := json.Marshal(data)
if err != nil {
log.Fatal(err)
return
}
err = msg.Respond(jsonData)
if err != nil {
log.Fatal(err)
}
msg.Ack()
}, nats.Durable(“weather-responder”))
if err != nil {
log.Fatal(err)
}
ready <- true
}
Upon message reception, the server generates weather data, serializes this data to JSON, and sends it back as a response to the client’s request.
Initiate the Requester
Function weatherRequester embodies the client’s behavior, crafting and sending a request to the server. It performs a blocking call, waiting for the server’s response before proceeding.
func weatherRequester(nc *nats.Conn) {
const subject = “weather.get”
msg, err := nc.Request(subject, nil, 10*time.Second)
if err != nil {
log.Fatal(err)
}
var data WeatherData
err = json.Unmarshal(msg.Data, &data)
if err != nil {
log.Fatal(err)
}
log.Printf(“Received response: Timestamp: %s, Temperature: %f, Humidity: %f”,
data.Timestamp.Format(time.RFC3339), data.Temperature, data.Humidity)
}
After receiving the server’s message, the function deserializes the JSON data, extracts the weather information, and logs it to the console, demonstrating the consumption of the data.
Finally to execute the responder and requester ensure you have the main method. Additionally, it needs to ensure that the client doesn’t proceed before server initialization.
func main() {
log.SetFlags(log.Ldate | log.Ltime | log.Lshortfile)
nc, js := connect()
defer nc.Close()
streamName := “WEATHER”
subject := “weather.get”
_, err := js.AddStream(&nats.StreamConfig{
Name:     streamName,
Subjects: []string{subject},
})
if err != nil && err.Error() != “stream name already in use” {
log.Fatal(err)
}
ready := make(chan bool)
// Start the responder
go weatherResponder(js, ready)
// Wait for the responder to be ready
<-ready
// Start the weather requester
weatherRequester(nc)
}
Rerun your application (go run main.go)