Report Memphis.dev Cloud Performance And Load Report
Tutorials
Part 4: Validating CDC Messages with Schemaverse

 Contents
This is part four of a series of blog posts on building a modern event-driven system using Memphis.dev.
In the previous two blog posts (part 2 and part 3), we described how to implement a change data capture (CDC) pipeline for MongoDB using Debezium Server and Memphis.dev.
Schema on Write, Schema on Read
With relational databases, schemas are defined before any data are ingested. Only data that conforms to the schema can be inserted into the database. This is known as “schema on write.” This pattern ensures data integrity but can limit flexibility and the ability to evolve a system.
Predefined schemas are optional in NoSQL databases like MongoDB. MongoDB models collections of objects. In the most extreme case, collections can contain completely different types of objects such as cats, tanks, and books. More commonly, fields may only be present on a subset of objects or the value types may vary from one object to another. This flexibility makes it easier to evolve schemas over time and efficiently support objects with many optional fields.
Schema flexibility puts more onus on applications that read the data. Clients need to check for any desired field and confirm their data types. This pattern is called “schema on read.”
Malformed Records Cause Crashes
In one of my positions earlier in my career, I worked on a team that developed and maintained data pipelines for an online ad recommendation system. One of the most common sources of downtime were malformed records. Pipeline code can fail if a field is missing, an unexpected value is encountered, or when trying to parse badly-formatted data. If the pipeline isn’t developed with errors in mind (e.g., using defensive programming techniques, explicitly-defined data models, and validating data), the entire pipeline may crash and require manual intervention by an operator.
Unfortunately, malformed data, especially when handling large volumes of data, is a frequent occurrence. Simply hoping for the best won’t lead to resilient pipelines. As the saying goes, “Hope for the best. Plan for the worst.”
The Best of Both Worlds: Data Validation with Schemaverse
Fortunately, Memphis.dev has an awesome feature called Schemaverse. Schemaverse provides a mechanism to check messages for compliance with a specified schema and handle non-confirming messages.
To use Schemaverse, the operator needs to first define a schema. Messaged schemas can be defined using JSON Schema, Google Protocol Buffers, or GraphQL. The operator will choose the schema definition language appropriate to the format of the message payloads.
Once a schema is defined, the operator can “attach” the schema to a station. The schema will be downloaded by clients using the Memphis.dev client SDKs. The client SDK will validate each message before sending it to the Memphis broker. If a message doesn’t validate, the client will redirect the message to the dead-letter queue, trigger a notification, and raise an exception to notify the user of the client.
In this example, we’ll look at using Schemaverse to validate change data capture (CDC) events from MongoDB.
Review of the Solution
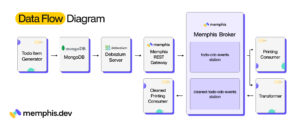
In our previous post, we described a change data capture (CDC) pipeline for a collection of todo items stored in MongoDB. Our solution consists of eight components:
- Todo Item Generator: Inserts a randomly-generated todo item in the MongoDB collection every 0.5 seconds. Each todo item contains a description, creation timestamp, optional due date, and completion status.
- MongoDB: Configured with a single database containing a single collection (todo_items).
- Debezium Server: Instance of Debezium Server configured with MongoDB source and HTTP Client sink connectors.
- Memphis.dev REST Gateway: Uses the out-of-the-box configuration.
- Memphis.dev: Configured with a single station (todo-cdc-events) and single user (todocdcservice)
- Printing Consumer: A script that uses the Memphis.dev Python SDK to consume messages and print them to the console.
- Transformer Service: A transformer service that consumes messages from the todo-cdc-events station, deserializes the MongoDB records, and pushes them to the cleaned-todo-cdc-events station.
- Cleaned Printing Consumer: A second instance of the printing consumer that prints messages pushed to the cleaned-todo-cdc-events station
In this iteration, we aren’t adding or removing any of the components. Rather, we’re just going to change Memphis.dev’s configuration to perform schema validation on messages sent to the “cleaned-todo-cdc-events” station.
Schema for Todo Change Data Capture (CDC) Events
In part 3, we transformed the messages to hydrate a serialized JSON subdocument to produce fully deserialized JSON messages. The resulting message looked like so:
{
  "schema" : ...,
  "payload" : {
    "before" : null,
    "after" : {
      "_id": { "$oid": "645fe9eaf4790c34c8fcc2ed" },
      "creation_timestamp": { "$date": 1684007402978 },
      "due_date": { "$date" : 1684266602978 },
      "description": "buy milk",
      "completed": false
    },
    ...
  }
}
Each JSON-encoded message has two top-level fields, “schema” and “payload.” We are concerned with the “payload” field. The payload object has two required fields, “before” and “after”, that we are concerned with. The before field contains a copy of the record before being modified (or null if it didn’t exist), while the after field contains a copy of the record after being modified (or null if the record is being deleted).
From this example, we can define criteria that messages must satisfy to be considered valid. Let’s write the criteria out as a set of rules:
- The payload/before field may contain a todo object or null.
- The payload/after field may contain a todo object or null.
- A todo object must have five fields (“_id”, “creation_timestamp”, “due_date”, “description”, and “completed”).
- The creation_timestamp must be an object with a single field (“$date”). The “$date” field must have a positive integer value (Unix timestamp).
- The due_date must be an object with a single field (“$date”). The “$date” field must have a positive integer value (Unix timestamp).
- The description field should have a string value. Nulls are not allowed.
- The completed field should have a boolean value. Nulls are not allowed.
For this project, we’ll define the schema using JSON Schema. JSON Schema is a very powerful data modeling language. It supports defining required fields, field types (e.g., integers, strings, etc.), whether fields are nullable, field formats (e.g., date / times, email addresses), and field constraints (e.g., minimum or maximum values). Objects can be defined and referenced by name, allowing recursive schema and for definitions to be reused. Schema can be further combined using and, or, any, and not operators. As one might expect, this expressiveness comes with a cost: the JSON Schema definition language is complex, and unfortunately, covering it is beyond the scope of this tutorial.
Creating a Schema and Attaching it to a Station
Let’s walk through the process of creating a schema and attaching it to a station. You’ll first need to complete the first 10 steps from part 2 and part 3.
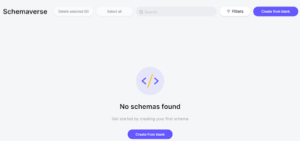
Step 11: Navigate to the Schemaverse Tab
Navigate to the Memphis UI in your browser. For example, you might be able to find it at https://localhost:9000/ . Once you are signed in, navigate to the Schemaverse tab:
Step 12: Create the Schema
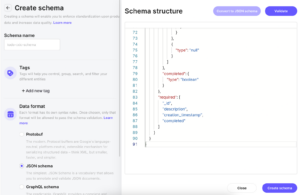
Click the “Create from blank” button to create a new schema. Set the schema name to “todo-cdc-schema” and the schema type to “JSON schema.” Paste the following JSON Schema document into the textbox on the right.
{
	"$schema": "https://json-schema.org/draft/2020-12/schema",
	"$id": "https://example.com/product.schema.json",
	"type" : "object",
	"properties" : {
		"payload" : {
			"type" : "object",
			"properties" : {
				"before" : {
					"oneOf" : [{ "type" : "null" }, { "$ref" : "#/$defs/todoItem" }]
				},
				"after" : {
					"oneOf" : [{ "type" : "null" }, { "$ref" : "#/$defs/todoItem" }]
				}
			},
			"required" : ["before", "after"]
		}
	},
	"required" : ["payload"],
   "$defs" : {
	  "todoItem" : {
		  "title": "TodoItem",
		  "description": "An item in a todo checklist",
	  	  "type" : "object",
		  "properties" : {
			  "_id" : {
				  "type" : "object",
				  "properties" : {
					  "$oid" : {
						  "type" : "string"
					  }
				  }
			  },
			  "description" : {
				  "type" : "string"
			  },
			  "creation_timestamp" : {
				  "type" : "object",
				  "properties" : {
					  "$date" : {
						  "type" : "integer"
					  }
				  }
			  },
			  "due_date" : {
			  		"anyOf" : [
						{
							"type" : "object",
							"properties" : {
								"$date" : {
									"type" : "integer"
								}
							}
						},
						{
							"type" : "null"
						}
					]
			  },
			  "completed" : {
				  "type" : "boolean"
			  }
		  },
		  "required" : ["_id", "description", "creation_timestamp", "completed"]
	  }
  }
}
When done, your window should look like so:
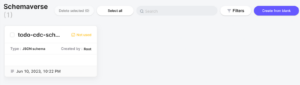
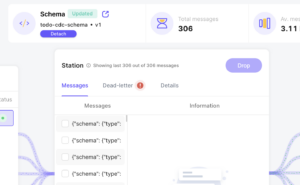
When done, click the “Create schema” button. Once the schema has been created, you’ll be returned to the Schemaverse tab. You should see an entry for the newly created schema like so:
Step 13: Attach the Schema to the Station
Once the schema is created, we want to attach the schema to the “cleaned-todo-cdc-events” station. Double-click on the “todo-cdc-schema” window to bring up its details window like so:
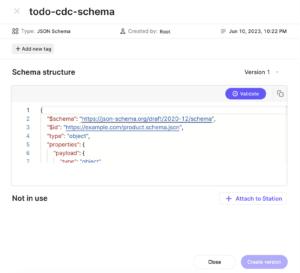
Next, click on the “+ Attach to Station” button. This will bring up the following window:
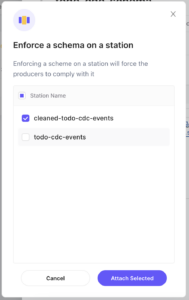
Select the “cleaned-todo-cdc-events” station, and click “Attach Selected.” The producers attached to the station will automatically download the schema and begin validating outgoing messages within a few minutes.
Step 14: Confirm that Messages are Being Filtered
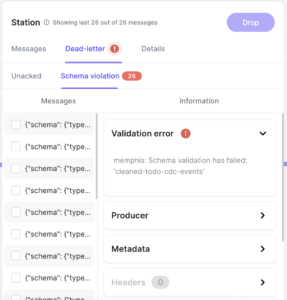
Navigate to the station overview page for the “cleaned-todo-cdc-events” station. After a couple of minutes, you should see a red warning notification icon next to the “Dead-letter” tab name.
If you click on the “Dead-letter” tab and then the “Schema violation” subtab, you’ll see the messages that failed the schema validation. These messages have been re-routed to the dead letter queue so that they don’t cause bugs in the downstream pipelines. The window will look like so:
Congratulations! You’re now using Schemaverse to validate messages. This is one small but incredibly impactful step toward making your pipeline more reliable.
Increasing data quality
A full tutorial on how to use schemaverse to increase data quality.
Read more

In case you missed parts 1, 2 & 3:
Part 3: Transforming MongoDB CDC Event Messages
Part 2: Change Data Capture (CDC) for MongoDB with Debezium and Memphis.dev
Part 1: Integrating Debezium Server and Memphis.dev for Streaming Change Data Capture (CDC) Events